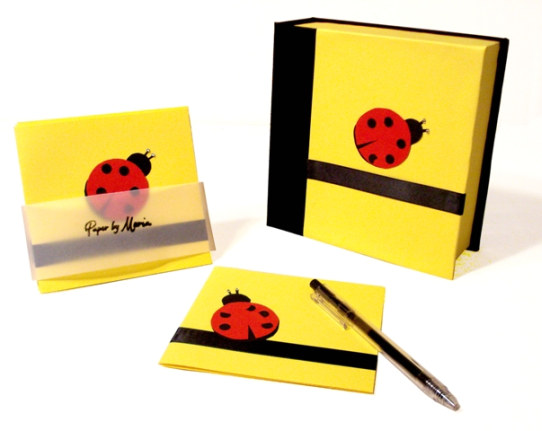
A few months ago, I was on a search to find boxes to package my handmade stationery. I searched high and low, but boxes just didn’t seem to come in the size I wanted. I was so desperate that I came close to paying a ridiculous price to have some boxes shipped from Asia, but luckily I stumbled across Paper Source on a weekend trip to Boston.
I walked past Paper Source’s window display of colorful papers and couldn’t resist stepping inside. I was so distracted by the beautiful papers that I almost missed the handmade boxes on display! They were so beautiful I wished I could learn how to make them myself. Luckily for me, Paper Source had all the materials to make boxes right there! I picked up some book board, bookbinding cloth, PVA glue, and an instruction manual, and headed home to make my box!
The PS instructions made the box construction easy to perfect with practice. I hadn’t worked much with PVA glue before, so that was a challenge at first. But I eventually found the best ways to handle the materials, and not get the table all sticky! I was happy to have my bone folder as well to smooth the paper down on the box as I glued. The handmade boxes turned out to be the perfect way to package my cards.
Here’s how I made my box: One by one, glue and secure the walls to the base.
Once you have secured all the walls, let the inner box set for about 10-15 minutes.
Once it is set, you can begin to cover it with your choice of paper. Cut a piece of paper long enough to wrap around the entire box, and leave extra room on the top and bottom to wrap underneath and inside. Set aside and work on the cover.
Glue the front and back covers and the spine of the box to the back of the book cloth. Fold and glue the book cloth around the covers and spine.
This is what the cover looks like before you decorate it! You can glue papers onto the front and inside of the covers…
Once the paper is glued on, glue the inner box onto the inside of the back cover.
And now I have a beautiful box to match my stationery!
–Maria Kanakis, www.paperbymaria.com – New York City, PS customer
PS colors: peacock & sunshine
Latest fave: Yuzen Fine Paper


I love that you wrote about this because I make stationery too and that was my hugest issue!!!! Btw your box is amazing. The only hard part for me is cutting the thick boards. Especially when i don’t have a whole floor made out of cutting mats! 🙂
What a fun, and functional, project! The boxes are really cute too. Great idea.
Maria, I’m so impressed with you. I use PS card stock and photos I’ve taken to make cards for my own use and gifts. Up til now, I’ve just put a pack together and tied beautiful ribbon around them. But you’ve inspired me to try making this charming box!! Thanks for the photo instructions – much easier to follow. It is impossible to walk by a PS store and not shop!
I’m so impressed Maria. I use PS card stock for my photos not only for my own use but for gifts. I usually tie a pack together with beautiful ribbon but now can’t wait to make this charming box. thanks!
Thank you for taking the time to show how you made the box. I’m always looking for something different to present my cards and this would be perfect.
I love making my own packaging ! Thank you for sharing !
Thank you I’m always looking for something different to create and this would be an awesome box project to start.
Hey everyone! Thanks for the comments! I’m glad you like my boxes! Feel free to check out my website (www.paperbymaria.com) or join my facebook page (Paper by Maria) for more tutorials and inspirations!