Learn our tips and tricks for giving guests the ultimate welcome package! Whether you are welcoming guest for a destination wedding or just want to make your guest room at home extra special these personal bags are easy to customize.
Things You Will Need:
- Colored Paper from the Paper Bar
- Folder Enclosures
- Fine Paper or Decorative Wrapping Paper
- Favor Boxes
- Custom Gift Bags
- Paper Trimmer
- Tape Runner
- Gift Tags
- Ribbon or Twine
- Printable Labels
Building Your Welcome Bag
To begin, start by determining the needs of your welcome bag. Will your guest need a snack or water upon arrival? Do they need to have an itinerary or directions for an event? Once you decide what necessities are needed in the package, you can then decided on additional fillers! We suggest these are more personal such as hometown treat or thoughtful moment to commemorate their stay. This can also help inform the theme of your welcome bag.
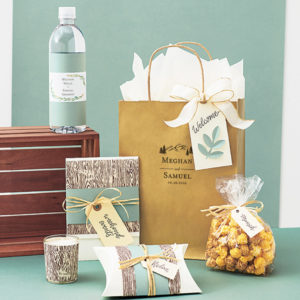
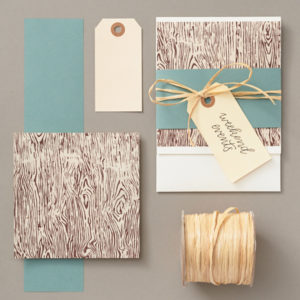
Once you finalize the pieces inside your welcome bag and the overall theme, you will need to look at decorative packaging needs and your color palette. We were inspired by a rustic, mountain wedding and wanted the guests to feel right at home. To achieve this look, we opted for a earthy pallet of wood grain fine paper and accents of eucalyptus paper. Below is how we packaged each piece of our guest bag for a cohesive and memorable look. Once each piece is complete, bundle them together in a personalized gift bag for the ultimate welcome!
Favor Boxes
A pillow gift box is perfect for locally made spa products or to collect emergency items that are nice to have on hand such as band-aids and pain relievers.
- Cut your decorative paper of choice into a 3.5″ x 11″ sash.
- Trim a solid piece of text weight paper into 2″ x 11″ strip.
- Wrap the wide sash around the pillow box and seal on the back using the tape runner.
- Wrap the narrow sash over your wide sash and adhere the same way.
- Then, select your ribbon or twine to tie a gift tag around the box. We used a raffia to match our rustic theme. Your gift tag should be a small message about the contents of the box.
- Fill the favor box with your items of your choice!
Enclosure Folder
An enclosure folder is a great way to compile information about the event. This could be a schedule, map and other important information or it is a special way to highlight local attractions and suggested restaurants.
- Select a folder enclosure color of your choice.
- Tuck your paper contents inside of the folder.
- Using your decorative paper, cut a 5″x5″ panel and adhere it to the top flap of the pocket folder enclosure with double sided tape or tape runner.
- Next, cut a 2.5″ x 11″ sash of your matching colored text paper.
- Wrap your colored sash around the entire folder and seal it on the backside with double sided tape or tape runner.
- Add your finishing details including ribbon and gift tag.
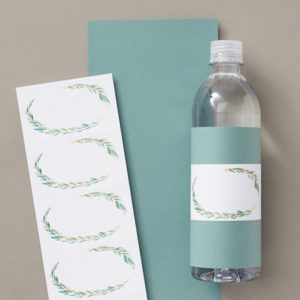
Personalized Beverage
Whether you are including a local bottle of wine, vintage soda or just a simple bottled beverage this simple DIY can really elevate your welcome!
- Trim your colored text weight paper to a size that will cover the label on the bottle.
- Wrap the paper around the bottle and adhere using the tape runner or double-sided tape.
- Next, customize your message on a printable label. This can be a name, date of event or a fun message.
- Adhere to the printed label over the colored paper for a custom made look.
Using this technique, we were also able make our simple candle feel custom for the event!
Extra Details and Handmade Gift Tag
Adding little accents such as ribbon, gift tags and labels are the perfect way to add personal elements to your welcome bag. For example, adding a gift tag and ribbon around simple packing like a cello bag will make your treat feel like an artisinal delight! Cello bags are so versatile for showcasing handmade snacks or candies that your guests will want to dive into after a long day. Below is how we made our handmade gift tag to coordinate.
- Using your coordinating text weight paper, select a paper punch to cut out dimensional shapes. We used a five leaf branch punch to fit our theme.
- To add dimension, crease the center of the leaves and fold to give them shape.
- Adhere the shape to your gift tag using the tape runner and add a personal message.
- Tie this gift tag using ribbon to the larger custom gift bag.
Finally, we suggest adding a hand written note and place all your pieces inside the gift bag. Then simply wait for your guests to arrive for the ultimate welcome.
Share your ideas for a guest welcome bag using #papersource.


[…] post DIY Moment: Ultimate Guest Welcome Package appeared first on Paper Source […]
This package should also include the wedding invitation card just in case.
[…] them with candy, knicknacks, or anything else you want to commemorate your special event. Click here for tips on how to create a great favor bag or welcome package for your […]